admin
-

本文档记录我当前使用的 Agent 架构情况,以便后续查阅、修改与调整。
目录
1. 在 OpenClaw 上的 Agent
目前,在 OpenClaw 上共有 4 个 Agent 分别是:
Agent ID 飞书机器人 概述 main Mike 默认主 agent,主要有三个功能:
* 作为主 agent ,有非常完整的权限管理系统
* 作为管理日历的入口,日常日历会从这里添加
* 作为备忘录/记事本入口,日常的零散记录入口在这里english Echo 个人英语使用相关的Agent,可以自动添加单词到词表中 family-magazine Maga 这是一个之前尝试制作个人家庭杂志的 Agent openclaw-codex Clark 该 Agent 可以在本地执行 Codex 去完成 long-running 任务 这里的飞书机器人命令,故意使用了 Agent ID 的第一个字母,还比较有意思。其中,“Clark” 是 Superman 的名字,希望 Codex 能够像 Superman 一样强大。
2. 运行环境说明
为了保障安全性、隐私性,所以我的 Agent 都没有运行在本地,而是运行在一台远程的 EC2 上,然后通过 ssh 进行管理。EC2 上运行了一个 OpenClaw,其中安装了上述四个 Agent。此外,EC2 上还安装了 Codex,Codex 的运行这里使用了两种运行模式,一个是终端直接运行,通过 screen 直接在终端运行了一个 Codex 进程,此外,还通过 OpenClaw 的 Agent (openclaw-codex)可以调用 Codex 。当前的 Codex 主要在仓库 for-codex-task 上运行,仓库中的 AGENTS.md 会定义 Codex 的行为,这主要是一个调研类的 Agent。
                                          Zex / Zhenxing
                                             |
           +---------------------------------+---------------------------------+
           |                                 |                                 |
           v                                 v                                 v
   +----------------------+        +----------------------+        +----------------------+
   | IM Entry Points      |        | SSH                  |        | Web GitHub Admin     |
   |                      |        |                      |        |                      |
   | Feishu / WeChat      |        | Remote shell access  |        | View / edit repo     |
   | Chat-based control   |        | EC2 operations       |        | Define Agent behavior|
   +----------------------+        +----------------------+        +----------------------+
           |                                 |                                 |
           | Manage OpenClaw                 | Manage EC2                      | View outputs
           |                                 |                                 | Edit AGENTS.md
           v                                 v                                 v
   +-----------------------------------------------------------+    +--------------------------+
   | Remote EC2 Instance                                       |    | GitHub Repository        |
   |                                                           |    |                          |
   |   OpenClaw                                                |    | for-codex-task           |
   |      ^                                                    |    |                          |
   |      | Feishu / WeChat management entrypoints             |    | Independent from EC2     |
   |      |                                                    |    | Defines Agent behavior   |
   |      +-- main / Mike                                      |    | via AGENTS.md            |
   |      |     +-- Master agent                               |    | Stores / exposes         |
   |      |     +-- Permission management                      |    | Agent running results    |
   |      |     +-- Calendar entry point                       |    +--------------------------+
   |      |     +-- Memo / notebook entry point                |                ^
   |      |                                                    |                |
   |      +-- english / Echo                                   |                |
   |      |     +-- Personal English agent                     |                |
   |      |     +-- Vocabulary list automation                 |                |
   |      |                                                    |                |
   |      +-- family-magazine / Maga                           |                |
   |      |     +-- Family magazine experiment                 |                |
   |      |                                                    |                |
   |      +-- openclaw-codex / Clark                           |                |
   |            +-- Invokes Codex                              |                |
   |            +-- Handles long-running tasks                 |                |
   |                                                           |                |
   |   Codex                                                   |                |
   |      |                                                    |                |
   |      +-- Mode 1: Terminal process                         |                |
   |      |     +-- Running directly in screen                 |                |
   |      |                                                    |                |
   |      +-- Mode 2: OpenClaw Agent                           |                |
   |      |     +-- Invoked by openclaw-codex / Clark          |                |
   |      |                                                    |                |
   |      +-- Working repo on EC2                              |                |
   |            |                                              |                |
   |            +-- for-codex-task                             |                |
   |                  |                                        |                |
   |                  +-- Synced with GitHub repository -------+----------------+
   |                  |     +-- pull AGENTS.md / tasks         |
   |                  |     +-- push Agent running results     |
   |                  |                                        |
   |                  +-- AGENTS.md                            |
   |                        +-- Defines Codex behavior         |
   |                        +-- Mainly research-oriented       |
   +-----------------------------------------------------------+
3. 改进@20260515
3.1 一个仓库所有的文件
当前,我把所有的文档都放在了一个 GitHub 仓库中,然后让 Codex 根据不同的任务类型将文件都放在这个仓库中,并通过不同的目录来进行管理。
例如,我的仓库包括了:独立新知识学习的目录(例如Iceberg)、系统方向学习目录(例如 memory、如何使用 codex等)、未分类的临时主题目录(这个目录可能是按照时间组织的)。
这种方式,当每次都是给出独立的、小型的任务的时候,是没问题的。并且管理和使用起来非常方便,一个 Agent 完成所有的工作。但是,当希望系统的、经常的在某一个主题上工作就不是很方便了。例如,我想在某个目录下(memory 主题、Iceberg主题)持续调研,这时候就不是很方便了。
所以,这里做了一个改进:将独立的、长期的主题独立出来,以独立的 Agent 运行。
3.2 长期主题使用独立的 Agent
4. Long-Running Task
现在一个 Code 的任务大概 5 分钟左右。很难一次让执行更长时间,而且,简单的当个任务让其完成更长的任务,实现的效果也不会很好。
那么,怎么设计面相与 AI 的 Long-Running Task 呢?
一个基础的策略是:
- 事先写更多的问题背景、要求
- 事先编写 review Agent 的要求,然后进入,执行 -> Review -> 修复 -> Review 的流程 从而实现 Long-Running
Lessons I learned
不要在一个大“上下文”里面做一个小事情
例如,在一个非常大的 Git 仓库下面,某次调用只是完成一个小的功能。这时候,AI 很容易因为要读取整个目录(或者结构),然后受到一些看似相关的内容,从而导致上下文被“污染”。而让 AI 的注意力被分散,结果通常是,事情可以被完成,但是需要更长时间,更多的上下文。
确定非常高的事情,可以考虑使用“程序”、“流程”完成
对于确定性非常的事情或者流程,最好让“程序”来完成,而不是 AI。这个“程序”可能是一个直接的脚本或者一个 SKILL,让 AI 调用,但是不要让 AI 来去做,AI 做的话,则会因为过分考虑各种情况,而设计(通常还会不断地改进)非常复杂的流程去完成。
不要过分追工具,而是专注于目标与任务
在最初(甚至很长时间以内),就算一般的工具能力都是超出“需求”的。例如,DeepSeek 、Qwen、Douban 都已经可以解决绝大数场景了,而不一定要使用 ChatGPT 、 opus 或者 Gemini。当你熟悉了这些工具如何完成你的任务之后,这时候就可以再尝试如何使用最 SOTA 的工具去做事情了。
把大任务分成小任务、多步骤
在当前阶段,要想让 AI 更好的去完成一个“长任务”,是需要一定设计的。其中一个办法就是:把大任务分成小任务、多步骤。然后让不同的 Agent 独立完成不同的部分。
给 long-running 编写更好的 Spec
-

本文记录我在使用 OpenClaw + 飞书时的一些配置信息,因为偶尔需要操作,故记录如下。
目录
1. 在 OpenClaw 中添加多个 Agent
这一次是需要新增一个叫 Clark 的 Agent ,该 Agent 用于在本地执行 Codex 完成一些复杂的任务。所以,特别的编写了一个对应的 Skill 用于告诉 OpenClaw 如何按照我的要求使用 Codex 。
1.1 添加新的 agent
openclaw agents add openclaw-codex
...(一些配置,需要注意,按需调整 workspace 的位置)
openclaw tui
/agent openclaw-codex
如果要切换当前的默认的agent,可以使用如下命令:
cd ~/.openclaw/workspace-family-magazine/
openclaw tui
-- or --
openclaw config set agents.defaults.workspace "/home/ubuntu/.openclaw/workspace-family-magazine"
openclaw tui
完成了 Agent 添加后,接着是 SKILL 的配置以及飞书 IM 的配置。
2. 飞书的多 Agent 配置
当只有单个 Agent 时,要配置飞书 IM 连接时,可以参考本文档的附录小结:“OpenClaw 内置插件教程(从零配置)”。本节主要介绍,当有多个 Agent 时,如何使用多个聊天机器人分别于不同的 Agent 通信。
在目前阶段,OpenClaw 依旧是面向于开发者的产品。例如,这里为了配置多 Agent ,并同时使用飞书进行管理时,整个的配置过程,就不是很简单,不喜欢折腾的开发者大概是会放弃的(注:当前版本 OpenClaw 2026.4.23 (a979721) )。
首先,在开始配置之前,需要理解一些概念:
- openclaw 中的“Agent”: openclaw 可以支持多 Agent 运行,每个 Agent 可以完成完全独立的一些事情,每个 Agent 都有自己的对的 workspace,以及完全独立的 SOUL/USER.md 等文件。大多数时候,我们默认的,都是只是默认的、“main” 这个 Agent。为了更好的管理,我这里额外在openclaw 中配置了一个叫“english Echo” 的Agent。可以参考本文档的章节“在 OpenClaw 中添加多个 Agent”了解多个 Agent 的添加。
- openclaw 中的 “channel”:channel 是指聊天通道,例如,与飞书的聊天通道。需要特别注意的是,通常,我们在这个通道中仅会配置一个 App(开放平台上的应用,对应于一个机器人)。但,要比较好的启用多 Agent 功能,这里需要建两个或多个 App (飞书开放平台的应用),从而我的飞书就可以与不同的飞书机器人对话,从而与不同的Agent 通信。
如果只是看上述的描述,大概比较难理解,这里先看看最终配置的效果,再看看对应的配置文件,从而完整的理解配置、以及如何使用。
2.1 飞书的 channel 配置
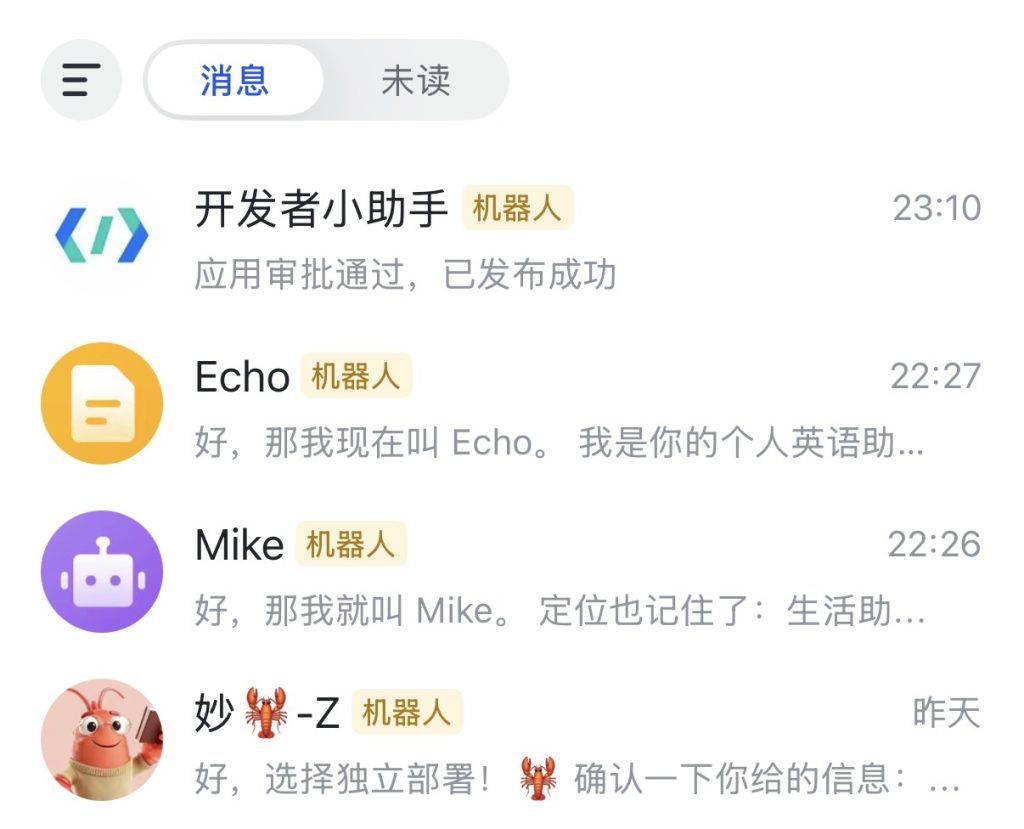
为了实现个人飞书能够通过两个独立的飞书机器人去调用一个openclaw 中的两个 Agent 。如右图注意到,机器人 Echo 和 Mike 都来自同一个 openclaw 中两个独立的 Agent。
例如,这里的 Echo 是一个英语助手,Mike 则是一个通用助手。而在 openclaw 中两个Agent 对应完全不同的workspace,也就是使用完全不同的 SOUL.md、IDENTITY.md 等。
如下的文本图描述了“消息流”,即我的飞书消息会到不同的机器人,然后 openclaw 的 Gateway 则将消息根据配置文件的绑定规则(即Binding 部分)将消息分发到不同 Agent 。文本图如左下:
                                 ------- OpenClaw -----
                                 |                    |
                                 |                    |
             ---> feishu bot 1 ---   --> Agent 1      |
             |                   |   |                |
 [ feishu ] -|                Gateway-                |
 [  chat  ]  |                   |   |                |
             ---> feishu bot 2 ---   --> Agent 2      |
                                 |                    |
                                 |                    |
                                 ----------------------
右边则是对应 “channels” 部分的配置,即在 “feishu”这个 channels 下有两个 accounts,分别是 main和english,根据对应 appId 则对应于聊天机器人 Mike 和 Echo。
  "channels": {
    "feishu": {
      "defaultAccount": "main",
      "accounts":{
        "main": {
          "enabled": true,
          "appId": "cli_***",
          "appSecret": "Qo92***",
          "connectionMode": "websocket",
          "domain": "feishu",
          "groupPolicy": "allowlist"
        },
        "english": {
          "enabled": true,
          "appId": "cli_***",
          "appSecret": "4y9h***",
          "connectionMode": "websocket",
          "domain": "feishu",
          "groupPolicy": "allowlist"
        }
      }
    }
  },
2.2 飞书的 bindings 配置
在新建了飞书的账号(channels.accounts)后,还需要将其于对应的 Agent 进行绑定,这样 Gateway 才知道该将对应机器人的转发给对应的Agent。这个绑定则由右边的配置文件来描述。
新增 Agent 则新增配置:
  "bindings": [
    ...
    {
      "agentId": "openclaw-codex",
      "match": {
        "channel": "feishu",
        "accountId": "codex"
      }
    }
  ],
"bindings": [ { "agentId": "main", "match": { "channel": "feishu", "accountId": "default" } }, { "agentId": "english", "match": { "channel": "feishu", "accountId": "english" } } ],2.3 终端使用 TUI
TUI 是 Text User Interface 的缩写,在 openclaw 中也可以通过 TUI 的方式更为方便的与多Agent 对话。首先通过
openclaw tui进入 TUI,然后使用/agent english即可与对应的 Agent 对话:openclaw tui session agent:main:main ... If you want, give me a real task and I’ll show you instead of pitching myself. gateway connected | idle agent main | session main (heartbeat) | openai/gpt-5.4 | think low | tokens 10k/272k (4%) ───────────────────────────────────────────────────────────────────────────────────── ─────────────────────────────────────────────────────────────────────────────────────在 TUI 中则可以通过
/agent english进行 Agent 切换:session agent:english:main ... connected | idle agent english (english) | session main (openclaw-tui) | openai/gpt-5.4 | think low | tokens 11k/272k (4%) ─────────────────────────────────────────────────────────────────────────────────────────────────────────── ───────────────────────────────────────────────────────────────────────────────────────────────────────────2.4 session key
上述内容中,值得注意的是,两个 session 取值分别为:
session agent:english:main和session agent:main:main。在实现底层,这时非常重要两个值,Gateway 用来管理不同的 session 。适当的理解这个这个值,则对我们理解和配置 openclaw 非常重要:agent : english : main agent : main : main agent :<agentId>:<sessionKey>三列分别表示:
agent“这是一个 agent 会话”<agentId>对应的 agent 是哪个?如果使用的是默认的agent则通常是main<sessionKey>这个对话对应“名称”,默认也是main
如果通过某个具体的 IM 与Agent 通信,那么对应的 Key 则可能是如下样子:
agent:main:feishu:direct:ou_80d10b4***********************5df8附录
🚀 OpenClaw 内置插件教程(从零配置)
该部分参考链接:openclaw-feishu/README.md
适用于:第一次使用 OpenClaw + 飞书的新用户,选择 OpenClaw 内置插件方案。 前提:已安装 OpenClaw 并正常运行(
openclaw gateway status能看到状态)。 预计耗时:15–20 分钟。第一步:创建飞书应用(机器人)
- 打开 飞书开放平台,用飞书账号登录
- 点击 创建企业自建应用
- 填写应用名称(随意,比如 “我的 AI 助手”)和描述
- 选一个图标(可以之后改)
第二步:启用机器人能力
进入你刚创建的应用:
- 左侧菜单找到 应用能力 > 机器人
- 开启机器人能力
- 给机器人起个名字
第三步:配置权限
- 左侧菜单进入 权限管理
- 点击 批量导入
- 粘贴以下 JSON(一键导入所有需要的权限):
{
  "scopes": {
    "tenant": [
      "aily:file:read",
      "aily:file:write",
      "application:application.app_message_stats.overview:readonly",
      "application:application:self_manage",
      "application:bot.menu:write",
      "cardkit:card:write",
      "contact:user.employee_id:readonly",
      "corehr:file:download",
      "docs:document.content:read",
      "event:ip_list",
      "im:chat",
      "im:chat.access_event.bot_p2p_chat:read",
      "im:chat.members:bot_access",
      "im:message",
      "im:message.group_at_msg:readonly",
      "im:message.group_msg",
      "im:message.p2p_msg:readonly",
      "im:message:readonly",
      "im:message:send_as_bot",
      "im:resource",
      "sheets:spreadsheet",
      "wiki:wiki:readonly"
    ],
    "user": [
      "aily:file:read",
      "aily:file:write",
      "im:chat.access_event.bot_p2p_chat:read"
    ]
  }
}
第四步:配置事件订阅
⚠️ 这一步必须在 OpenClaw 网关启动后再做,否则保存会失败。 先做第五、六步,回来再做这一步也可以。
- 左侧菜单进入 事件与回调 > 事件配置
- 请求方式选择:使用长连接接收事件(这是关键!不需要公网服务器)
- 添加事件:搜索
im.message.receive_v1(接收消息),勾选添加
第五步:记下凭证
在应用的 凭证与基础信息 页面,复制:
- App ID(格式如
cli_xxxxxxxxx) - App Secret
❗ App Secret 很重要,请妥善保管,不要分享。
第六步:发布应用
- 左侧菜单 版本管理与发布
- 创建版本 → 填写版本说明 → 提交
- 等待审批(企业内部应用通常自动通过,几秒到几分钟)
第七步:在 OpenClaw 中配置飞书
OpenClaw ≥ 2026.2 已内置飞书插件,不需要额外安装,直接配置即可。
💡 如果你在首次
openclaw setup时看到 “Install Feishu plugin?”,选择 “Download from npm” 即可进入配置流程。选了 “Skip” 也没关系,用下面的命令随时添加。打开 终端(Terminal):
# 1. 添加飞书渠道(交互式,跟着提示走)
openclaw channels add
# 选择 Feishu → 粘贴 App ID → 粘贴 App Secret
第八步:发消息测试
- 在飞书里搜索你的机器人名字,打开对话
- 发一条消息,比如”你好”
- 如果机器人回复了配对码,在终端运行:
openclaw pairing approve feishu <配对码>- 授权后再发一条消息,收到正常回复 = 配置完成 🎉
回来补第四步:如果你先跳过了事件订阅,现在网关已启动,回到飞书开放平台把第四步做完,保存后重启网关(
openclaw gateway restart)。第九步(可选):让机器人开机自启
openclaw gateway install这样电脑重启后机器人也会自动上线。


